XSLT —> TEI to HTML & Corpus Transformations
Once all files in a production volume are fully encoded in TEI and each file’s TEI validates in Oxygen, it’s time to convert these completed XML files to HTML so that they can be presented on the web. You’ll continue to use OxygenXML for this process.
NOTE: The following guide assumes that you’re working from a local clone of RC’s TEI repository on GitHub. If for some reason you’re not coding from inside the RC-TEI repo, you should clone it using the steps in the Git Guide and move all your TEI files into the current production volume’s folder.
About the transformation process
To convert a completed TEI document to HTML for web presentation, a transformation scenario must be set up and executed. The process uses a series of XSL (eXtensible Stylesheet Language) files that contain (1) stylesheet instructions that express what RC’s XML (TEI) code means, and (2) transformation (XSLT) templates that tell Oxygen how to turn XML markup into valid HTML. RC’s original XSLT templates were created by Laura Mandell in 2011; with the rebuild of the RC site in Drupal 10 in 2022/23, T. J. McLemore adapted new XSL(T) stylesheets and templates based on these original files but altered for compatibility with the Saxon processor (after the deprecation of the Xalan processor). Both versions of RC’s XSL(T) files were adapted from the TEI consortium’s default stylesheets. Historically the adapted templates have met nearly all of RC’s needs, but from time to time a specific transformation may require slight editing of the XSL(T) files. The XSLTs can be found in RC’s XSL(T) GitHub repo.
NOTE: As of 2023, the RC production process will use two distinct (but nearly identical) sets of XSLT template files: one for purposes of HTML proofing (“html_PROOFS” folder) and one for final publication, to create HTML for import to the Drupal site (“html” folder). Both sets of templates can be found in RC’s XSLT repo. The only difference between them is the “proofs” XSLTs produce documents with clean notes, while the “publication” XSLTs output extra HTML that enables the “hover” functionality on the RC site; the latter transforms output the text of each note twice in the HTML, making the resulting documents unsuitable for non-Drupal proofing purposes.
For more information about how XSL(T) works and resources to navigate RC’s XSLT templates, see the Languages Overview contained in the Technical Documentation.
Setting up a transformation scenario
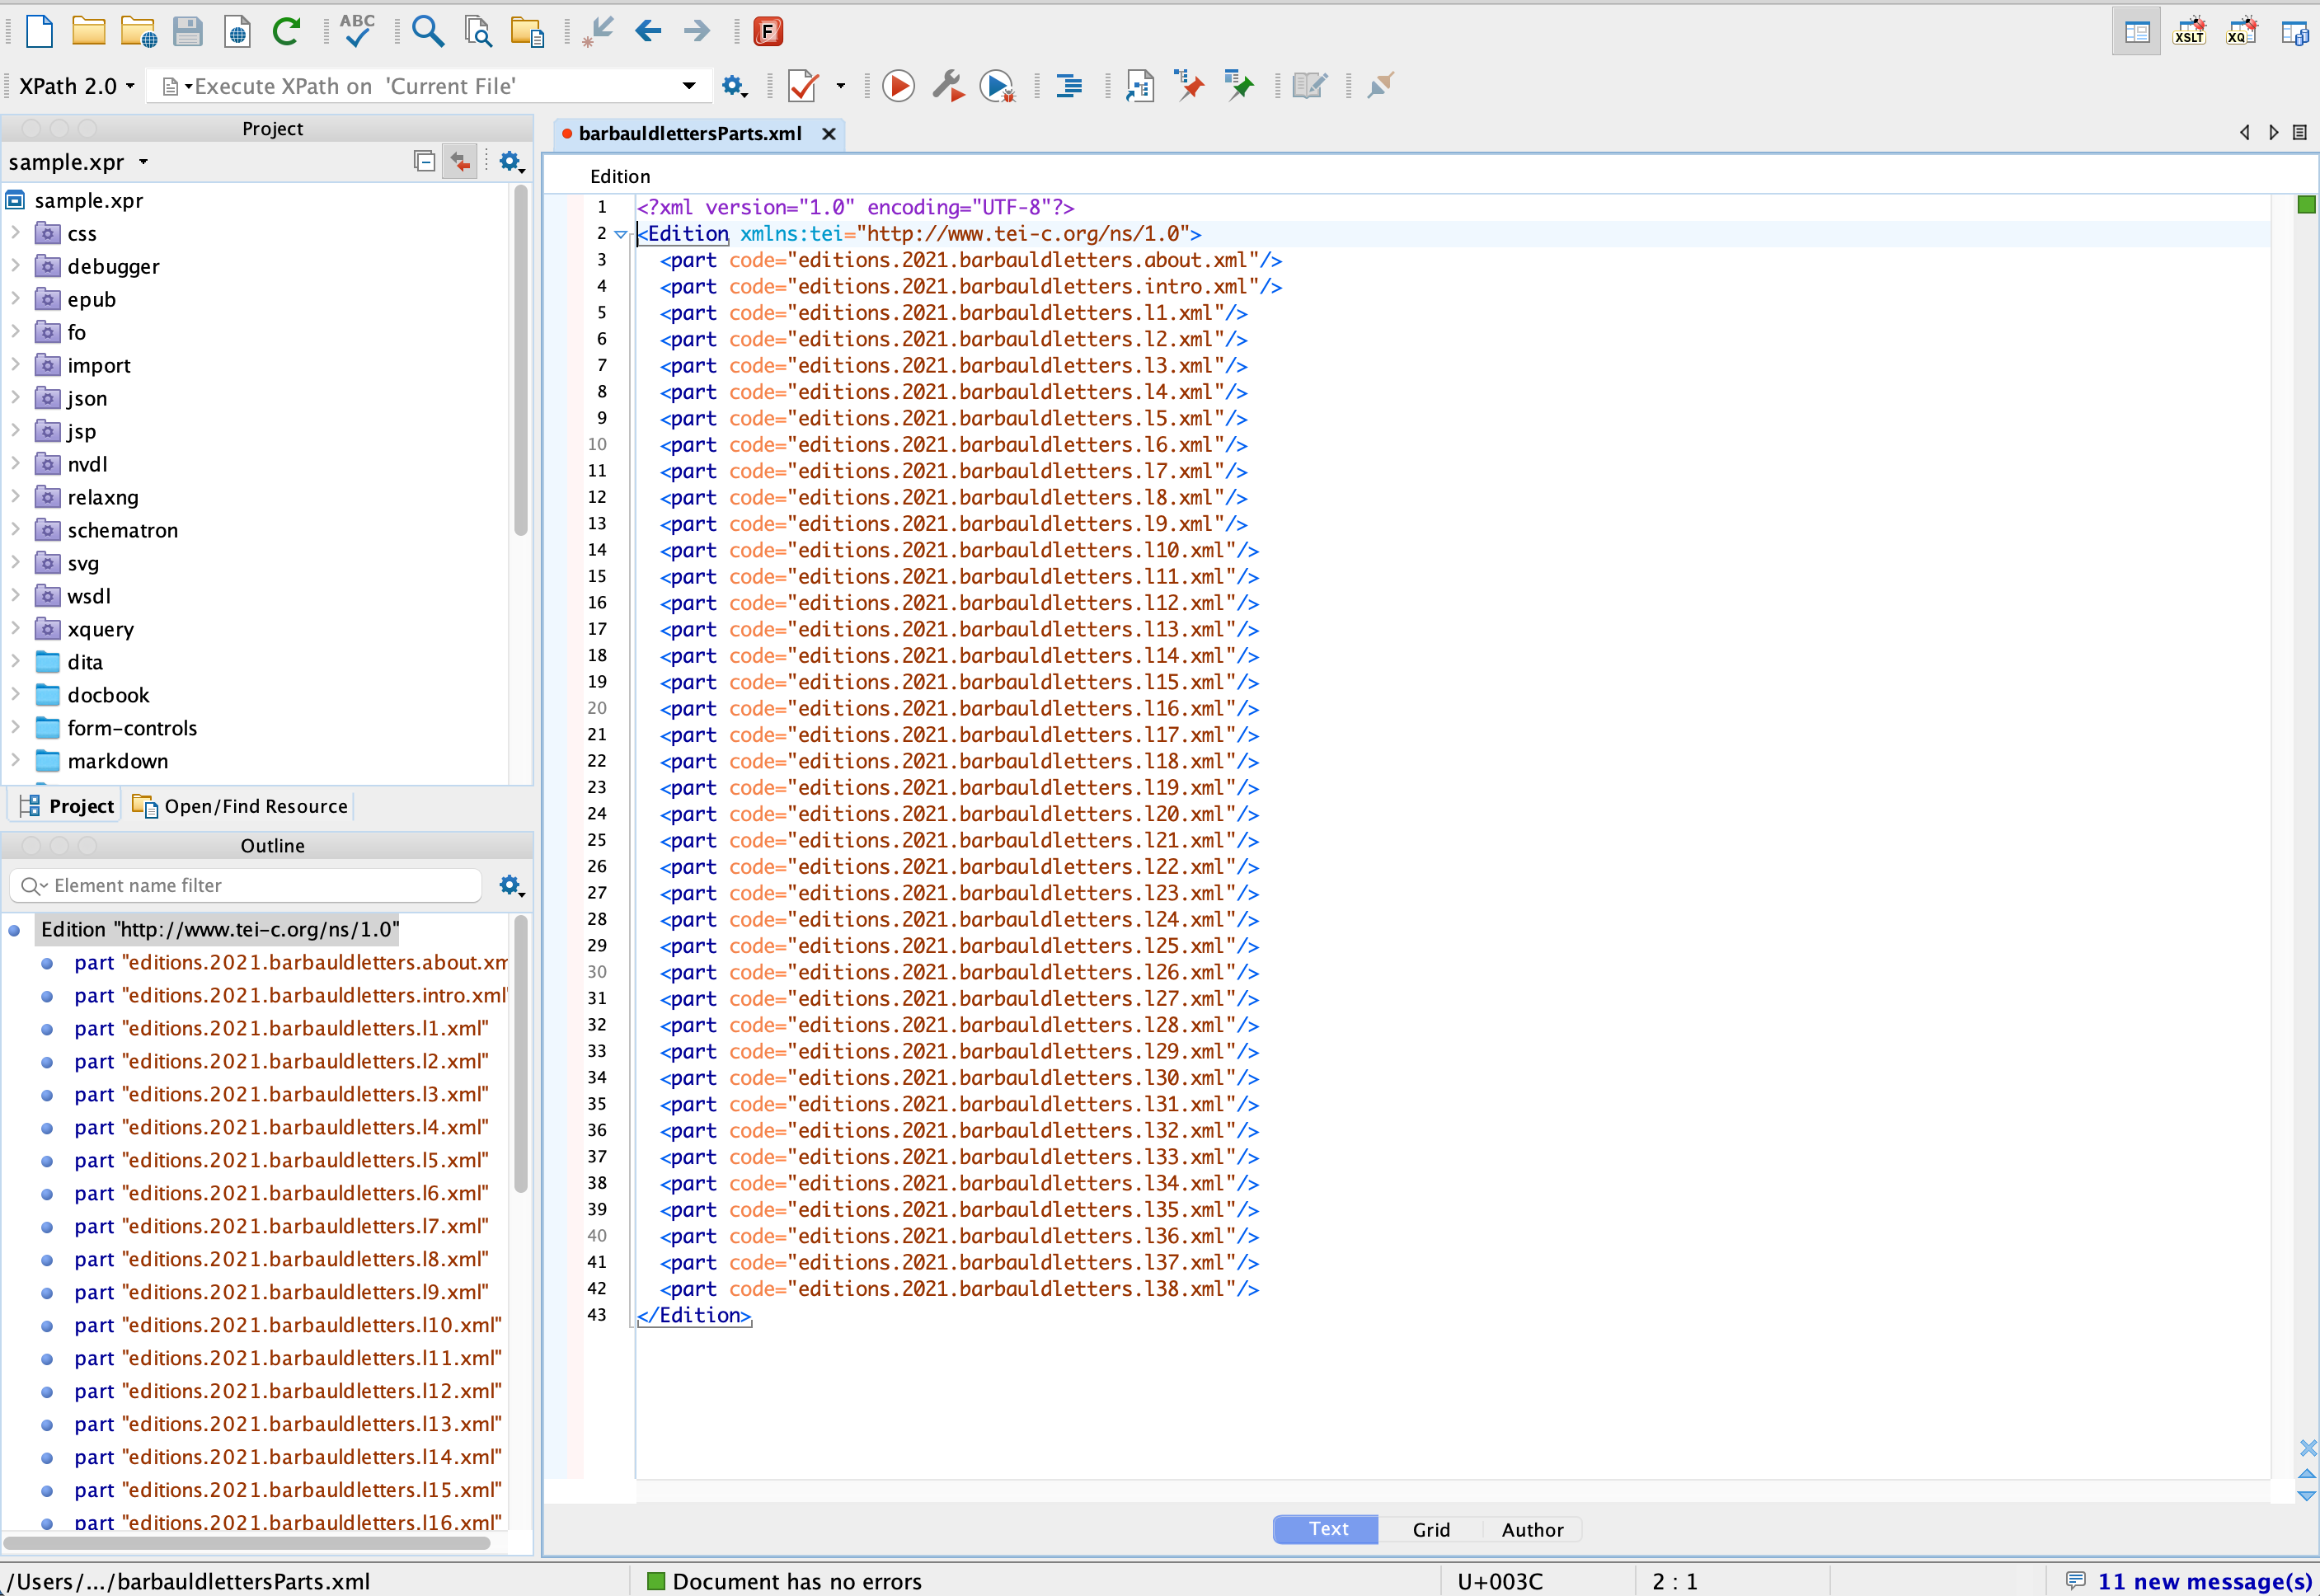
To set up a transformation scenario in OxygenXML, you’ll first need to create a “parts” file. This file essentially points to all the XML documents you will be transforming to HTML, and it should be in the same working directory as your TEI files inside your local TEI repo. All parts files have an identical structure, so you can simply adapt one from any previous volume in RC’s TEI repo; each volume will have a single parts file, which will be named “[volume]Parts.xml.” Open one of these files and rename / save it into the same folder as the volume’s TEI files.
To use the parts file, open it in OxygenXML and simply change the part code in each line to contain all the filenames of your TEI files (e.g., <part code="praxis.2020.popkeats.rejack.xml"/>). Here’s what this looks like:

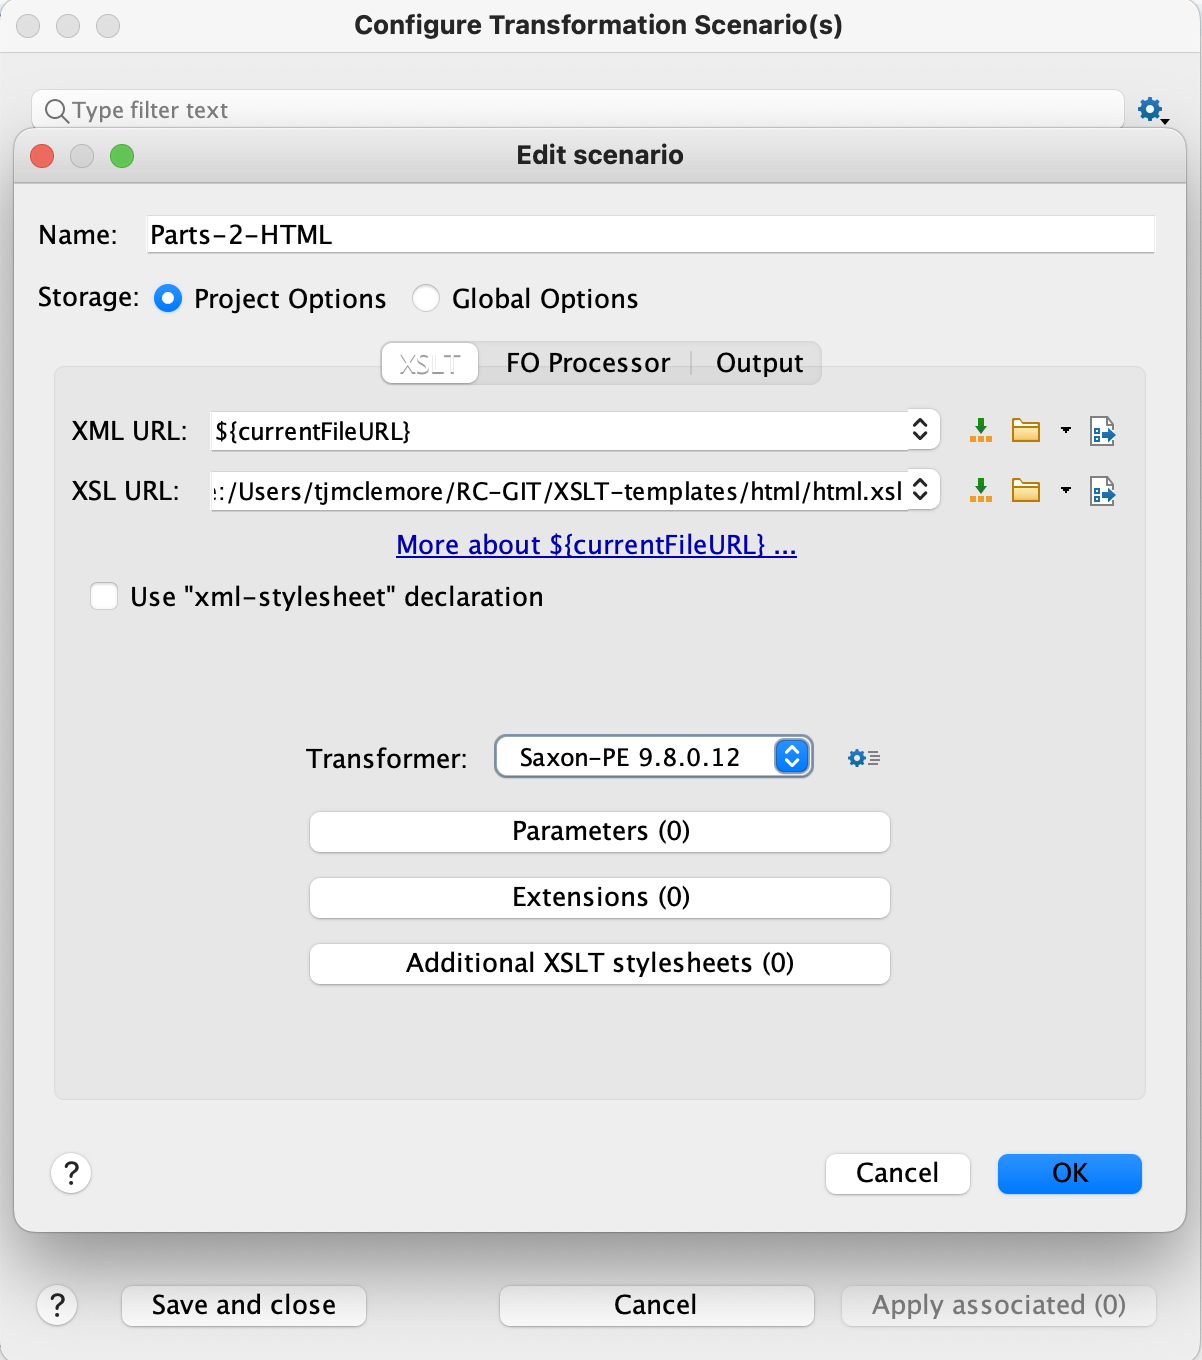
Next you must configure the transformation scenario. With the parts file open, click on the wrench-and-play-symbol icon in the toolbar (“Configure Transformation Scenario”). Click “New —> XML transformation with XSLT” to create a new scenario. Give the new scenario a name; consider giving it a generic name (e.g., “Parts-2-HTML”) since Oxygen will save it for later reuse. Leave the XML URL field as “${currentFileURL}.” Beside the XSL URL field, click the file folder icon and navigate to your local “XSLT-templates” repo, then html / html.xsl. Select this file and click OK. Under the Transformer dropdown menu, select “Saxon-PE x.x.x.x” (the most up-to-date version available in your Oxygen installation should be fine). Click OK to save the scenario.
NOTE: To perform a transformation to produce files for HTML-only proofing, simply create a “proofs” scenario (e.g., “Parts-2-proofs-HTML”) and point it to the “html_PROOFS” repo folder instead:
html_PROOFS / html.xsl.

To perform the transformation, simply select the “Parts-2-HTML” scenario from the “Configure Transformation Scenario” dialog (the wrench symbol on the toolbar) and then click “Apply Associated (1).” If it executes successfully, you’ll see a “Transformation Successful” message and a green light on the bottom bar. Navigate to the volume directory in your TEI repo and look in the folder containing all the TEI files; for each TEI file, you should now see an HTML file that has been created by the transformation process.
Open each HTML file to ensure the transformation has successfully rendered the text. Note that this local HTML file is NOT a perfect look at what the document’s appearance on the web will be, but these files can be used to evaluate and troubleshoot your TEI code. Simply edit your TEI files and repeat the transformation process until everything looks as it should.
If Oxygen validates the TEI and seems to complete the transformation but the resulting HTML files are blank or somehow corrupted, an error is present (likely a “rendition” command in the TEI for which no instructions are present in the XSLTs). Check the error log in Oxygen and/or review any unusual markup you’ve used in the document. Sometimes figuring out what’s wrong requires a bit of experimentation; just keep tinkering with the TEI (and transforming only one file at a time, if need be) until it works.
TEI corpus and metadata XSL transformation
The final transformation necessary before you can upload a volume’s documents to the site is to create a TEI corpus file. This is the file that will import the volume’s metadata to the site; it is essentially a single XML document that merges the content of all the volume’s TEI. Once uploaded, it will create nodes for each essay’s abstract; link each author, contributor, and/or editor to their existing node (bio) on the RC site; populate the metadata tags for each essay; and carry any other encoded metadata into the site’s taxonomy system.
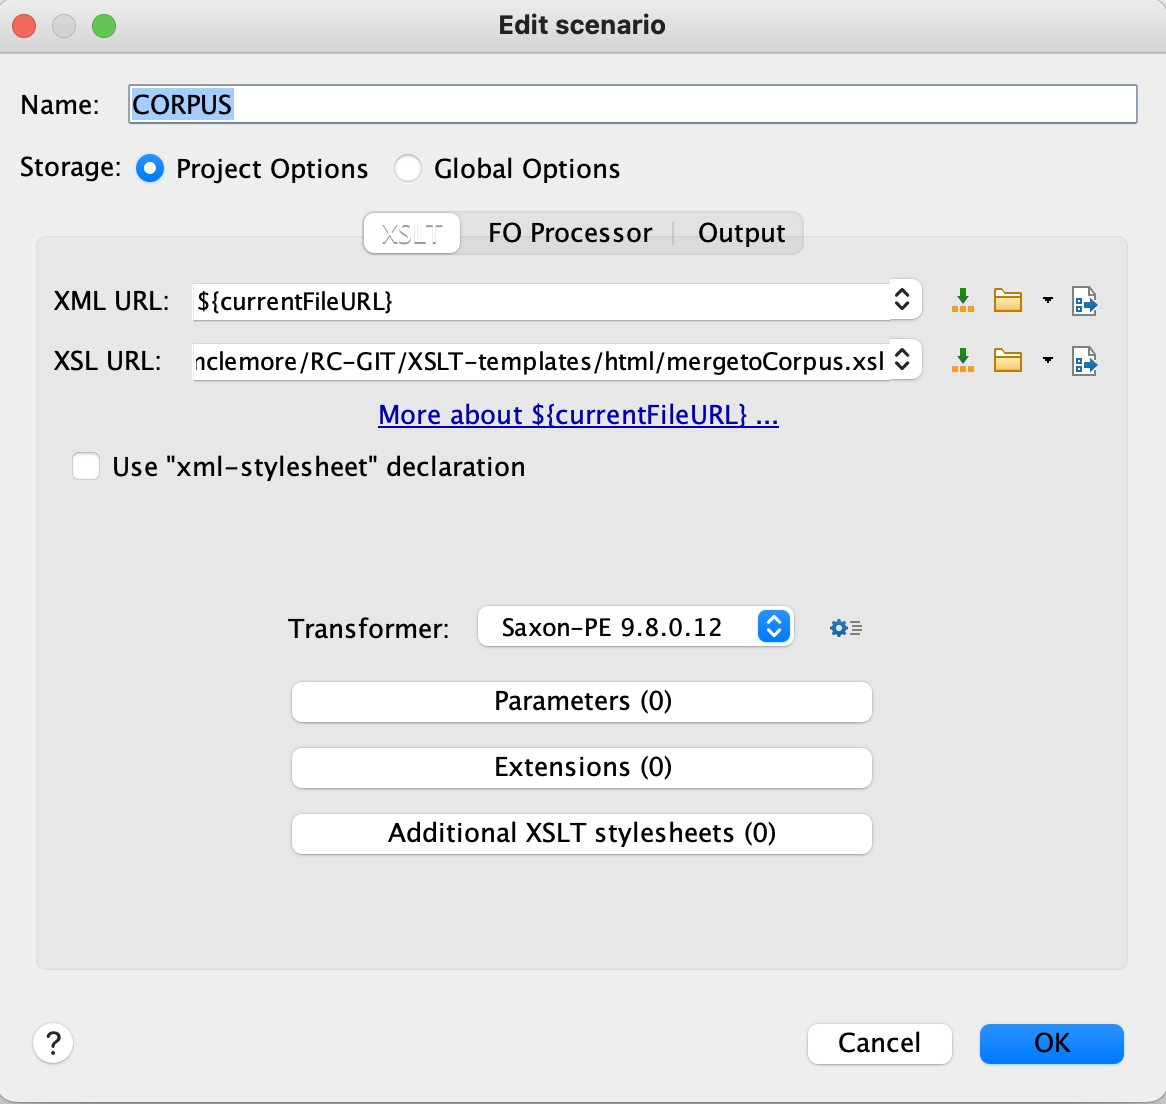
To create the corpus file, simply repeat the steps in the preceding section required to configure an XSLT to HTML transformation, but this time name the new scenario something else (e.g., “CORPUS”). Navigate to the html directory, as above, but select the “mergetoCorpus.xsl” file in the XSL URL field.

When you run the transformation, a new frame will appear at the bottom of the screen; it should contain many thousands of lines of code, as the transformation has merged the entire volume’s XML markup into a single file. Create a new XML file, copy-and-paste the corpus transformation output into that file, and save it in the same folder as the other TEI files as “[volume]Corpus.xml.”
Once you have generated an HTML file for each essay and a parts file for the volume, everything’s all set to begin importing content into the Drupal site.