Using Git—An Overview
As you begin working with git, it will be helpful to understand the basics of what git does behind the scenes as well as a list of basic git commands. Most basically, git is a bit of software that can live inside any of the folders on your computer to make sure they stay synchronized with your team members’ folders anywhere in the world. This is, as you’d imagine, incredibly helpful when you’re working on a complex site or application with a bunch of other people. After working through this guide, you should be able to perform a basic git workflow as well as troubleshoot common problems.
Always remember: if you run into anything that looks scary or throws back an error message, Google it! Someone on StackExchange, or even Reddit, has the solution to your problem (or, as has been the case for me far too many times, a way out of a stupid situation you’ve put yourself in).
This guide assumes you’ve already cloned one of RC’s repos and have the ability to pull to and push from it. For a walk-through of cloning repos and validating your credentials to push changes, see the Installing Git and Cloning Repos section.
Git local
A folder tracked by git — i.e., a git repo — on your computer will look like any other folder on your system. But it contains a hidden .git/ folder that logs the entire history of changes made to the repo. This is a three-tiered process, and escalating between these tiers requires the git commands add and commit. Let’s take a look at this useful diagram by Roger Dudler:
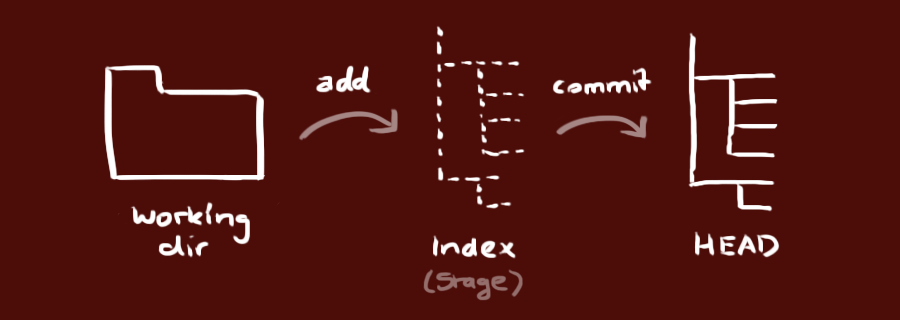
The Working Directory holds your actual files — this is essentially your root project folder and its contents. The Staging Area (or Index) is a scaffold that git builds when you begin adding files and making changes to your source code. And finally, the git HEAD is a reference “snapshot” that points to the tip of your local repo (or, more accurately, the tip of whichever git branch you’re on). If you commit your changes to git, this moves the HEAD up to the present moment, meaning you’re “up to date” with all local changes.
Note the arrows with “add” and “commit” in the above diagram; these are the git commands that first stage your changes (add) and then commit those changes, which means moving your HEAD “snapshot” up to reflect the current state of your working directory. See below for how to execute these commands via the command line and/or git GUI (graphical user interface) software like GitHub Desktop.
Commit messages
Every commit to your repo will require a “commit message.” This message can be entered via the command line, or if you’re using a git interface you’ll be able to enter a commit message in the specified field.
The mantra about commits is to commit early and commit often. Your messages should be brief, informative, and legible to everyone on the project. For more on how to write a good commit message, check out this post.
Git local + remote
The final conceptual tool you’ll need to use git is syncing your local changes to and from the remote origin, or central repo. The relevant commands when checking for and syncing changes with the remote are fetch, pull, and push.
To understand the local <–> remote git workflow, consider this image, which presents a more complete (and more complicated) git workflow, incorporating the remote repo into our imagined workflow:
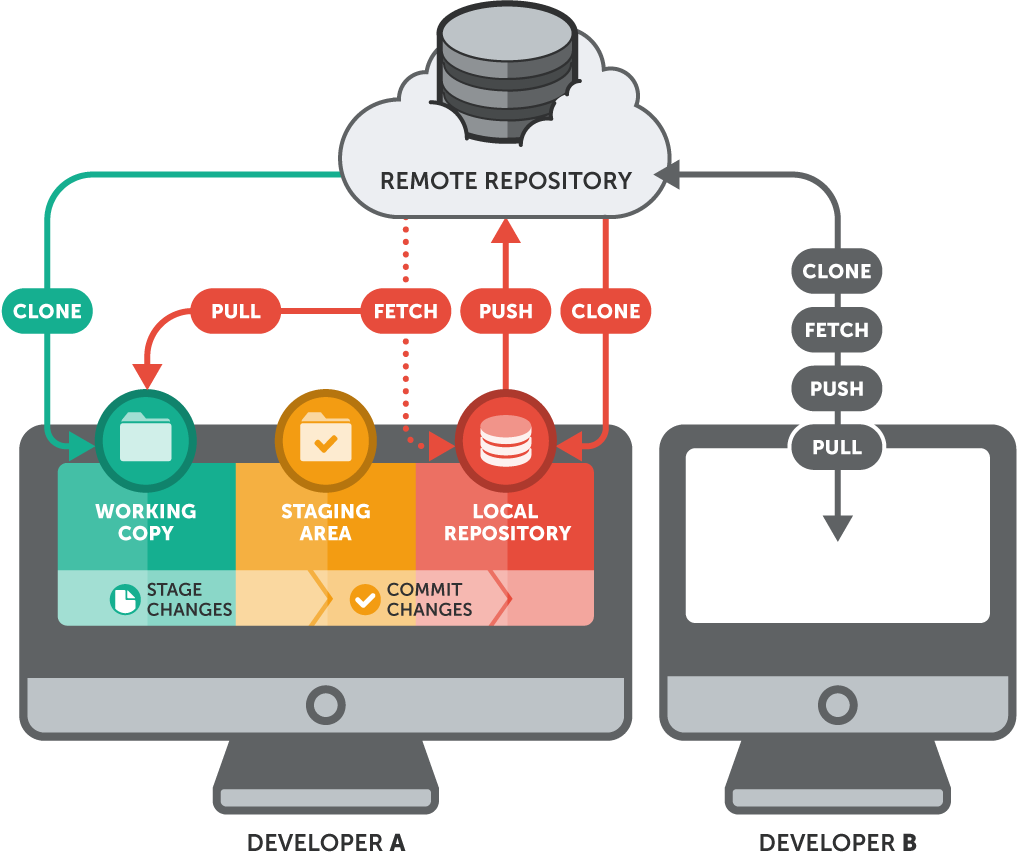
Note how this image rehearses the clone, add, and commit commands covered in the previous subsection, and presents them as taking place inside the user’s local machine. Since this is a shared project repository, however, there are other contributors working on these files too: in addition to local changes, we must consider changes to the central repo (remote).
THIS PART IS IMPORTANT
Any time you begin working in a git repo to which other collaborators are making changes, it is vital that you pull in all changes that have been made to the remote to your local repo before you start editing files. This is what the fetch and pull commands are for: fetch pings the remote and downloads new commits and files from the remote repository without changing anything in the state of your local repo; pull, on the other hand, downloads all remote content for the active branch and merges it into your local repo, completely bringing your local files up to date with the remote origin.
The best practice when opening a git project is to run a fetch to see if any changes have been made to the remote. If they have, you should pull these into your local repo to ensure everything is synced up before you begin making changes.
The flip-side of starting work on a shared repo with a pull is to push all changes to the remote after making any substantial changes, and always before closing the project for the day. Push is, of course, the opposite of pull, pushing and merging any new commits to your local repo into the remote. The workflow here is add (stage files/changes), commit (bring the HEAD of your local repo up to the present), and then push (send and merge your commit[s] to the remote origin).
Note: Git workflows can get much more complex, and this workflow does not (for example) apply to projects with multiple branches. Under normal circumstances (i.e., you’re not undertaking major updates or testing), work on all RC repos can and should remain on the “main” (or “master”) branch. For more on git branching (for intermediate to advanced users), see git documentation and Atlassian’s helpful tutorial.
Error messages
At some point in using git, you’ll likely encounter an error message, which will result in git refusing to execute your command. This is a good thing: git is smart and won’t let you overwrite changes either to your local repo or your remote unless you force it to. As with other RC matters, any time you feel unsure or out of your depth with git, it’s best to contact an RC assistant editor. This is especially true if you get a git conflict message (which, because of RC’s workflow, should only happen if you and another contributor make different changes to the same part of the same file). Minor errors, however, particularly with your local repo, can often be solved via a simple web search — git is used very widely among developers, so there’s no lack of help from the online community.
Using Git
The following sections will walk you through basic use of git once you’ve installed and configured it.
Git Tools
There are a host of “git helper” apps that will allow you to clone repositories, perform git commands, and commit and push them back to origin with an elegant graphical interface. Here are the ones that work well with both of RC’s git hosts and that we recommend:
- GitHub Desktop: the simplest way to access and clone GitHub repos (you simply log into GitHub via the app) that also plays well with Acquia
- GitKraken: an extremely powerful git GUI that matches GitHub Desktop’s ease of use, but prettier. If you’re a student, you can get it for free by signing up for the GitHub Student Developer Pack.
- GitLens: an extension for Visual Studio Code (recommended for RC assistant editors) that adds extensive git functionality to VS Code. Also free with the GitHub Student Developer Pack.
With any of these tools, you’ll be able to achieve the git workflow described above with simple button clicks. It’s worth noting that in GitLens, the “git push” and “git pull” commands are managed via a single “Sync” function (wherein you cannot, for example, pull from the remote before you’ve committed and pushed your changes). If you’re interested in using git with the command line, see the next section.
Git commands
Using git via the command line (terminal) is surprisingly easy and satisfying. While, as noted above, git usage can get significantly more powerful and advanced than what this guide can delve into, the following commands should allow you to do everything you need to with git via the command line (and maybe get out of a few tight spots as well).
NOTE: When using the command line, it’s always possible that text output will place you in an instance of the visual text editor (vim). You can always exit vim with the
qkey, but if you hit something else and get “stuck,” the keystrokes to exit areescand then:q.
$ git clone <repo url>: a command used to clone a remote repo to your local machine; it will place the repo as a new folder inside the directory you run it from. Note that you’ll need a repo url (can be found in Acquia Cloud or GitHub) for this to work.$ git status: displays the state of your local staging area (index) and working directory. You’ll see which files are untracked (haven’t been added via git add), which changes are unstaged and ready to be committed, and which changes are committed locally and ready to be pushed to origin.$ git fetch: executes a fetch from the origin without affecting the local repo.$ git pull: executes a fetch from the origin and merges its changes with local repo (updates it to match the remote).- In certain cases,
git pullcan throw an error if you’ve added work to your local branch before executing a pull (which is why “pulling” at the beginning of a work session is so important). The pull command is essentially a git fetch + git merge to combine the most recent remote changes with your local branch. If these two “branches” (local and remote) are too different, the command won’t execute. You may be prompted to pass the –ff-only flag to the pull command:$ git pull --ff-only. This is the safest way to deal with this situation, as it will only execute the fetch + merge if it can “fast-forward” your local branch non-destructively (see the entries for git merge and git rebase, below). If your local branch can’t be fast-forwarded, it’s usually fine to use the “–rebase” flag:$ git pull --rebase, but try not to make a habit of it.
- In certain cases,
$ git add: used to add files to be tracked by git. With this command, untracked files enter the index and become unstaged files.- This command requires that you specify options via a “flag,” namely what to add (or “track”). You can specify an individual file, an entire directory, or a global option that simply adds anything untracked in the project folder. Here are those options:
$ git add <file>,$ git add <directory>, or, to add all files in the current folder, use$ git add .. - To add all (new) files in the entire repo, use
$ git add -A. This is an immensely useful option.
- This command requires that you specify options via a “flag,” namely what to add (or “track”). You can specify an individual file, an entire directory, or a global option that simply adds anything untracked in the project folder. Here are those options:
$ git commit: used to commit local changes to the local repo prior to pushing them to the origin. Commit stages unstaged files, preparing them for push, but note that commit does not stage untracked files, which must be tracked using$ git add. Every individual commit requires a message to accompany it that summarizes the content of the commit.- Like git add,
$ git commitrequires flags (or, at minimum, a commit message). To ensure that all new files are tracked, it’s always a good idea to include the “-a” flag, and the “-m” flag allows you to type a message inside the command itself. Here’s an example:$ git commit -a -m 'added git commands to site documentation'
- Like git add,
$ git push origin <branch>: pushes all commits to the remote origin. Note that if you’re working in a repo with a single origin and a single branch (‘main’ or ‘master’), the simple command$ git pushwill suffice.
More advanced commands & undo options (use with caution!):
$ git fetch --all: fetches all remotes.$ git branch: without any options or flags, shows local branches available for checkout; the current branch will be highlighted with an asterisk beside it. To create and switch to a new branch, use the command$ git branch <new-branch-name>. Let’s say you want a branch called “test”:$ git branch test.- After you create a new branch, it’s important that you set git up to track it once you’ve pushed it back to the origin (essentially “syncing” local and remote versions of the branch). The easiest way to do this is to use the “-u” flag (or “–set-upstream”), specifying both the remote and the new branch’s name. For any RC repo, this will look like
$ git push -u origin test. (Luckily, git is smart!–if you forget to specify your upstream [origin] branch, the system will prompt you to do so. You can also go back anytime and set a branch’s upstream using$ git branch -u origin/test.) - To view all available branches in the repo (i.e., including those a teammate may have created and pushed to the remote), use
$ git branch -a. Locally available branches will appear in white, which remote branches will be given in red with their full path (e.g.,remotes/origin/test). - To checkout and work on a remote branch, first check it out from the remote:
$ git checkout origin/test. To use it locally, simply check it out now as if it were a local branch:$ git checkout test. You should get a message saying “Branch test set up to track remote branch test from origin.” You’re all set. (It’s also possible to do this with a single command, if you know you want the branch locally:$ git checkout --track origin/test.)
- After you create a new branch, it’s important that you set git up to track it once you’ve pushed it back to the origin (essentially “syncing” local and remote versions of the branch). The easiest way to do this is to use the “-u” flag (or “–set-upstream”), specifying both the remote and the new branch’s name. For any RC repo, this will look like
$ git checkout <branch>: lets you switch between local or remote branches; view available local branches with$ git branch, remotes with$ git branch -a. See also the subpoints under “git branch,” just above.$ git stash: this command “stashes,” or saves, all the uncommitted changes you’ve made to a repo and sets them aside. This can be super useful if you’re not ready to commit and/or push changes for something you’ve been working on, but simply want to set those changes aside and work on something else. To reapply your stashed changes, simply issue the command$ git stash pop. (If you’ve created new files that are untracked, they won’t automatically stash; use the flag -u to do so.)$ git log: shows the project history in the form of all commits that have been made. This can be useful if you need to revert the repo to the state of a previous commit since it shows you the hash (number) of all commits. After you run this command, use spacebar to advance through the history, and you’ll need to typeqto exit the output. Use the “–oneline” flag to condense this history to easily see commit hash numbers:$ git log --oneline.$ git diff: without options this command shows any uncommitted changes since the last commit. Exit withq. To compare two different branches, use$ git diff <branch1>..<branch2>.$ git merge <branch-to-merge>: merges the named branch with the current branch. If the branch histories are too divergent, or have conflicting changes, the merge will fail and will have to be reconciled. To abort a failed merge, use$ git merge --abort. (For more on merge conflicts, see this guide.)- Merges are non-destructive: they don’t delete any files, and they don’t change either branch’s git history. It’s a simple incorporation of one branch into the other.
- NOTE: Ensure that you’ve checked out the branch you want to merge a feature branch into, usually the “master” or “main” branch. This can be a bit scary the first few times you execute a merge, but just remember that you’re running the merge from the branch you want to update (with, e.g., a new feature).
$ git rebase: this command is related to git merge, but it destructively combines branches, creating a clean linear history. You should avoid using it in any RC repo; use merge instead. (Note that this command is related to but distinct from the “–rebase” flag that will occasionally be needed with a pull command—though, as noted above, always try the “–ff-only” flag first.)$ git clean: removes and scrubs changes from all untracked files (that haven’t been tracked via “git add”). This command essentially scrubs your history and returns you to the last commit. Use with tag-nto perform a “dry run” and see which files would be scrubbed. To actually run the command, you’ll need to add the-f(force) flag since this deletion cannot be undone:$ git clean -f.$ git revert <#>: this is a powerful “undo” option that undoes changes from a specific (recent) commit. Most often you’ll want to use$ git revert HEAD, which will invert changes from most recent commit, though git can find an older commit and remove only its changes as well. Use “git log” to find a specific commit number to target.$ git reset: this powerful command moves the HEAD and branch refs to a specific commit, essentially allowing you to “rewind” the history and start over from a specific commit. Usually used with the flag--hardto scrub all changes and history back to a previous commit. Without pointing to a commit hash or file, it resets to the most recent commit. This is a destructive command that can lead to changes that cannot be undone; read this documentation in full before you use it.- Use
$ git reset --hardas often as you need! It will erase everything you’ve done since the last commit and return your local repo to that state. This can be quite useful.
- Use
If you’d like to learn more about git, Atlassian has a fantastic in-depth tutorial that expands on this guide & digs into some more advanced functions.