Uploading Files (SFTP + File System)
The Secure File Transfer Protocol (SFTP) is a standard connection protocol used to transfer files between a remote server and a local client (your machine). An FTP client is a software application that enables navigation of the server’s remote file system using a familiar, user-friendly UI; it allows you to access, write, and delete server-side files exactly as you would on your own hard drive (using Finder or File Explorer).
Note that you’ll need a SSH key pair that’s been validated on the Acquia server before you can access the site’s file system. If you need it, here’s a walk-through for generating an SSH key and uploading it to Acquia Cloud Platform.
SFTP & Acquia
Acquia allows connections to all three environments using a third-party FTP client. This allows access to all files stored on the server, including production files, Drupal installation and configuration files, and the code repository itself. Management, updates, and maintenance of the codebase, MySQL databases, and Drupal installation are best accomplished using the tools described above, except in the case of a major Drupal migration or reinstallation. But setting up the FTP client for file access is vital to the production and publishing process for RC volumes, including uploading metadata information (TEI corpus files), HTML documents, image and multimedia files, etc., to the server. Production files are uploaded directly to the prod environment (and then, as noted above, the filebase will periodically be propagated down to the dev environment if current content is vital to dev work).
Cyberduck setup and FTP navigation
Many free FTP clients exist, but we’ve decided to use Cyberduck, which is free and easy to use.
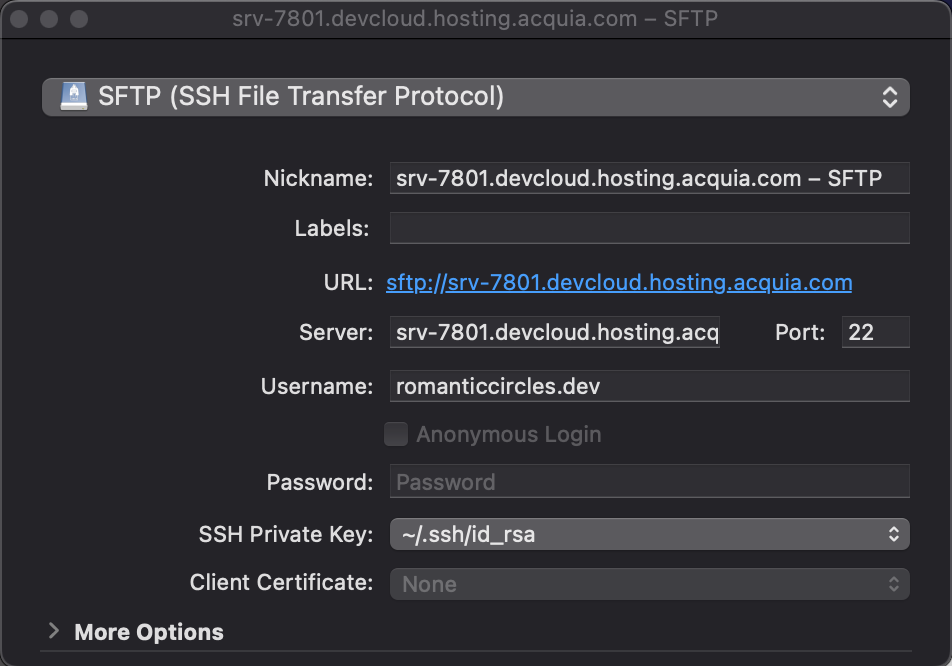
To open an FTP connection to the server, open Cyberduck and click “Open Connection.” Under the type of connection dropdown list, select “SFTP (SSH File Transfer Protocol).” Choose a nickname for the connection, point the “SSH Private Key” dropdown to your id_rsa file, then fill out the server field, port number, and username as reflected in this screenshot:

Note that the SSH key serves as your password, so this field remains blank.
Click “Connect,” and you should see the site’s file system populate.
Uploading and linking content
The file structure of the site can be a bit difficult to navigate at first. Most production volume files will need to be placed into a directory under the following path:
romanticcircles/prod/sites/default/files/imported/[site section]
Each site section folder contains a list of folders, one for each volume published within that section.
Tip: The file system is not automatically organized by type, which can make navigation difficult. To change this, first view the files as a list (View / as list), then add a sorting column for file type to your list by selecting View / Columns / Kind. Now click the sorting arrow on “Kind” in the table head to organize the directories by type as you open them so that you can easily see the folders in each subdirectory.
Uploading files to the server is as simple as dragging them from your hard drive into a location in the FTP, just as you’d do on your local hard drive. There are generally two types of files you’ll upload to the FTP during the production process:
- HTML files to be parsed by the Drupal’s feeds modules; and
- images or other media.
For an overview of the former process, see the previous section, Drupal Feeds Importers; HTML files should be placed in the “feeds” folder at the path provided above (sites/default/files).
For media and other inline files, the file path must exactly reflect each relevant link—to a .jpg image, for instance—given in a page’s HTML. Thus if a Praxis essay contains images, its image paths will be something like romanticcircles/prod/sites/default/files/imported/praxis/[volume-name]/images/[img.jpg]. Simply right-click inside the volume folder and create the required “images” folder, then drag each image from the RC shared Google Drive into this new folder in the FTP.